

Welcome to Juno College
We’ve been teaching people to code since 2012, and we’ve mastered pairing the perfect students with the perfect material and learning environment. How do we know you’ll love Juno?
Don't just take our word for it.What We're Going to Cover
This session will give you a sneak peek into our Continuing Education JavaScript Courses at Juno. Whether in a part-time or accelerated format, you’ll spend 36 in-class hours per course mastering curriculum that is regularly updated to ensure you’re learning the best, most relevant programming topics.
This workshop will introduce some basics and snippets of what's possible with JavaScript, and students will leave with a completed project!
Getting Started: Tools
Web Browsers
The main functionality of the browser is to present a web resource in the browser window.
Choose a modern, evergreen, web browser that supports current web standards. Some example of evergreen browsers include Firefox and Chrome.
Developer Tools
In Google Chrome and in other browsers, we can access the console, where we can test our JavaScript code right in the browser. Right-click / two-finger tap anywhere on the browser and select Inspect, then in the top tab select Console.
- Option 1: right-click / two-finger tap on a web page and select Inspect Element
- Option 2: Ctrl + Shift + I (PC) / Cmnd + Option + I (Mac)
Text Editor
The Text Editor is used to write and edit code
- preinstalled editors (Notepad / TextEdit) don't include many features
- paid and free options include features such as colour highlighting and plugins for improving workflow
- some great options: Atom, Sublime Text (unlimited free trial), VSCode.
- CodePen is totally free and is a web editor. You can write HTML, CSS, and JavaScript and get a real-time preview. Best of all you can share what you've created for freeeee
console.log("Hello friends!");
CodePen
Let's take a look at the project we will be building today.
View the completed project in full page here and we can take a look at the code here.
We're going to "fork" a starter file that has all of the necessary text, image links, and colours for our project today.
Once you save the pen, you unlock a few extra features. You get even more features if you verify your email address! I would recommend doing that now!
Intro To JavaScript
What is JavaScript?
JavaScript is one of the most popular programming languages in the world and is the cool cousin of HTML and CSS.
Many companies have come to embrace JavaScript as their language of choice, Uber, Netflix, Ebay, Paypal, NASA, etc.
JavaScript allows us to create complex interactivity on our web pages, and really makes our web pages come alive.
Think of your webpage like a house. The structure of the house would be the HTML (the beams, the boards, the drywall), the design would be the CSS (the paint, the flooring), and the functionality would be the JavaScript (the lightswitch, the plumbing).
REPL
A REPL stands for read, evaluate, print, loop.
It is an interactive environment, where you can type instructions for the computer to read, evaluate it, print the result back to you, then make itself ready to take on another instruction, in a loop.
We've already seen a place where we have access to a JavaScript REPL, in the developer tools.
    > 1 + 1
    2

    > "cup" + "cakes"
    "cupcakes"
Expressions and Values
One of the ways we can call instructions we give a computer is an expression. 1 + 1 was our expression. It is any piece of code/instruction given to our computer that produces a value.
What the computer returns to us is called a value. 2 was our value. A value is a piece of data.
Variables
One of the most useful parts of a programming language, is being able to store pieces of data, and use them later 🔄. We can store pieces of data in variables.
A variable is like a little box in the head of a computer, where information can be stored for later and retrieved when needed.
Declaring a Variable
We can declare a variable with the special keyword var, which tells the computer, we are about to make a variable.
var potato;
Our potato variable doesn't hold any value yet, it will return undefined if we call for it in the console.
To give our potato variable a value to hold, we can assign our variable a value using the = operator.
potato = "potato";
We can also change the value of our potato variable, we can reassign the value of a variable using the = operator again.
potato = 5;
Instead of the word "potato", our potato variable now holds the number 5, maybe to indicate how many potatos we have.
To declare a variable and assign it a value at the same time, we can put everything together onto 1 line.
    var yellowPotato = "yukon gold";
    var alivePotato = "Mrs.Potato Head";
    var potatoCount = 12;
Naming Conventions
There are a few rules for naming our variables:
- no spaces
- no starting with a number (3potatoes is invalid as a variable name)
- case sensitive. A variable named potato and one named Potato are 2 completely different variables with different values.
- use Camel Case to separate words (northernPotatoFarmer)
- descriptive. var country is much more desciptive than var c
Using Variables as Values
We saw that we can assign values to variables, but did you know that variables themselves, can be used as values?
    var myPotatoes = 2;
    var yourPotatoes = 3;
    var ourPotatoes = myPotatoes + yourPotatoes;
Now ourPotatoes holds the value of 5.
    >  ourPotatoes
    5
Types
We saw how variables hold values, pieces of data.
Each value in JavaScript is of a certain type. What type a piece of data is will determine what we can do with it in JavaScript.
The different types that are available in JavaScript are:
- Numbers - 10, 0.3
- Strings - "hi!", "5 pieces"
- Booleans - true/false
- Undefined - no value
- Null - value of nothing
- Objects - stores complex collections of data
Today we'll be focusing on strings.
Strings
We've seen strings as well, they are all characters including spaces.
They must be contained in single quotes ' ' or double quotes " " to be a valid string.
    > "Cake is tasty."
    > "92"
    > 'what?#!?%?'
String Concatination
It might surprise you to know, that we can also add strings using the + operator!
    > "I love " + "JavaScript" + "!";
    "I love JavaScript!"

    > var language = "JavaScript";
    > var sentence = "I love " +  language + "!";

    > sentence;
    "I love JavaScript!"
Arrays
What if we wanted to store a list containing many strings, or many numbers in one variable? We can do that with a built in JavaScript object, an Array.
An Array can hold as many elements as you can dream of.
To create an Array, we utilize the [ ] square brackets and commas to separate each element.
    var weekDays = ["mon", "tue", "wed", "thur", "fri"];

    var bingoDraws = [8, 14, 2, 3, 11, 21, 7];
There are many different ways to access values in an array and do something with them.
Let's learn about functions so we can dive into a cool way to access elements in an array.
Functions
Functions are chunks of code that can be called to run at anytime when they're called to action, and they perform a certain task.
Functions are possibly the most powerful concept in any programming language but especially in JavaScript. They allow you to unlock your powers as a JavaScript wizard.🔮💫
We are going to use functions today to:
- grab HTML elements on our page
- add and remove CSS classes from them
- access values in arrays
- listen to events from users interacting with our page
- we'll be writing some of our own custom functions as well
Defining a Function
A function is defined with the function keyword, followed by the name you would like to call your function, and then a set of smooth brackets ( ) and curly { } brackets.
    function nameOfFunction() { }

    function nameOfFunction() {
        // do things here
    }
We can using a special built in function in JavaScript console.log() to print something to the user.
Let's work in our CodePen and try out some code.
console.log("Hello JavaScript Wizard!");
console.log() will log the thing we gave it in our console!
Lets put our console.log() into a function called sayHiWizard()
    function sayHiWizard() {
        console.log("Hello JavaScript Wizard!");
    }
Hmm.... 🤔 nothing gets logged out to the console this time.
This is because we can define a function at any time, but to actually use the function we've defined, we need to call it to action!
If we don't call our function, it will never run.
To call our function we use the function name, followed by a pair of ( ) brackets.
sayHiWizard();
Like magic!
    // defining a function
    function lovePotatoes() {
        console.log("I love potatoes so much!");
    }

    // calling a function
    lovePotatoes();
Exercise: Writing Your Own Functions
In CodePen, write the following function and call it:
-
Write a function that console logs out this sentence:
"Hi my name is [yourName], but they call me [nickName]."
Replace [nickName] and [yourName] with names that relate to you.Hi my name is Nicolas Cage, but they call me The National Treasure.
Parameter
Instead of running the same code over and over again, we can give our functions a parameter as we define the function, so we can pass in different values to our functions during the function call.
If we can pass different values to work with each time into our functions, we have the power to reuse our functions in more situations!
To add a parameter to your function definition, pop the name of the param in between the ( ) brackets.
This name is completely up to you, it is just a placeholder for the values that will actually be passed in during a function call.
        function dinnerPotatoes(potatoNum) {
            /* potatoNum is this function's param! we can now do something with the value of what is passed in for potatoNum in our function */
        }
We can use string concatination to console log out a sentence with our placeholder potatoNum that can hold any value!
        function dinnerPotatoes(potatoNum) {
            console.log("I'll have " + potatoNum + " potatoes for dinner.");
        }

        // lets pass in the number "8" where potatoNum is
        > dinnerPotatoes("8");
        "I'll have 8 potatoes for dinner."

        // we can also pass in a variable!
        > var myPotatoCount = "52";
        > dinnerPotatoes(myPotatoCount);
        "I'll have 52 potatoes for dinner."
The DOM
Manipulating the elements we see on our page is one of the best parts about using JavaScript for web development. To learn how we can manipulate things we see on the page, let's learn about the DOM.
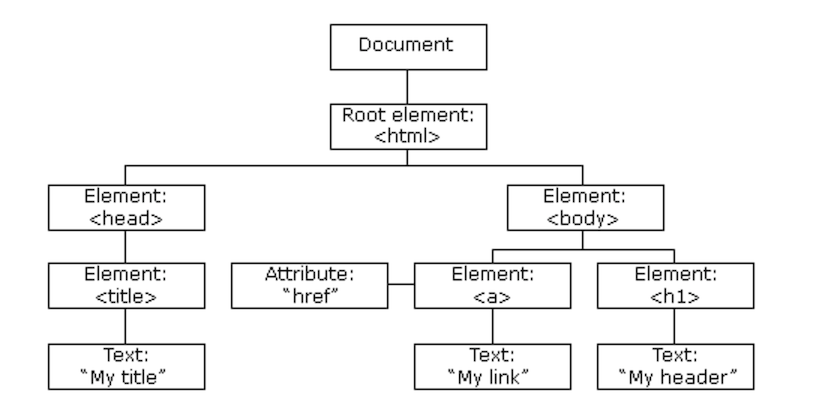
What is the DOM
The DOM stands for document object model, it represents all the HTML elements on our page in a tree like structure. When we talk about using JavaScript to manipulate the DOM we are adding removing, and changing functionality and style to elements on our page.
To access the DOM, we can use keyword document.
Let's type that into our browser's console and see what we get back!
Grabbing Specific Elements from the DOM
We can grab specific elements from the DOM using .querySelector() and .querySelectorAll(), these special functions are available on our document.
Let's try grabbing a few HTML elements from the page.
    document.querySelector("h1");
    document.querySelectorAll("p");
document.querySelector( ) will return the first matched element found in the DOM.
document.querySelectorAll( ) will return all matched elements in a nodeList (kind of like an Array)
Theres a lot we can do to an element once we grab it from the DOM.
Event Listeners
Here comes an incredibly fun part of JavaScript, listening to user interactions with the elements on our page. 🎧
When a user clicks something, hovers over something, presses a key on their keyboard, these are all events we can listen for on DOM elements, and after we hear on of these events we can write code to react to these interactions!
We can listen for events on DOM elements using the .addEventListener() function.
document.addEventListener("event", functionToRun);
.addEventListener() takes 2 things in between the brackets () , the event we want to listen for, and the function we want to run when the event has been heard.
Codealong
Let's go into our CodePen and add an event listener to the document to listen for the keydown event, which will listen to everytime a key on the keyboard is pressed down.
    document.addEventListener("keydown", function(){
        /* code to run here when
        "keydown" event is heard */
    });
In our function that we passed in, let's make it log out to our console in CodePen that a key was pressed down, to see the event listener working.
    document.addEventListener("keydown", function(){
        console.log("A key was pressed down!");
    });
Now that we know when any key is pressed, we want to know exactly which key is pressed.
The function we pass into .addEventListener() can optionally give us access to the event, that is triggering it to run. We can gain access to the event that triggered the function by passing in the event between the ( ) brackets of the function.
We can use e to stand for event. Let's copy and paste the code below into the browser console, to see what e is, and what information it holds.
    document.addEventListener("keydown", function(e){
        console.log(e);
    });
When we open Keyboard Event object in our console we can see a bunch of different properties that we have access to.
Find the "key" property, it's value should be the key that you pressed! 🤯
    document.addEventListener("keydown", function(e){
        console.log(e.key);
    });
This is super useful, because in our HTML, we have audio elements that have an id matched with a specific key letter id. You'll notice that each of our div elements that hold the visual representation of each.
Let's store our key pressed in a variable.
    document.addEventListener("keydown", function(e){
        var key = e.key;
    });
Now that we know which key is being pressed, lets grab the appropriate audio element from the DOM with the matching id so that we can play on keydown!
Inside of our event listener let's select correct DOM element using string concatination and the key, passing those in as a string into document.querySelector().
    var audio = document.querySelector("audio[id='" + key+ "']");
    console.log(audio);
Now each time we press down on a key we see the actual audio element from our DOM. We can play an audio element in JavaScript using the .play() function.
audio.play();
If we hit a key that has a longer sound like [S] we'll notice that even if we press it again we won't hear the sound play again until the audio file is finished playing.
Well, we want to spam our drum kit 🤟🏻. There is a special property called .currentTime that is available on our audio element that allows us to set the current position; in seconds, of our audio playback.
If we set the currentTime of audio back to 0 everytime before we play it, then we won't have to wait for the audio to finish playing before playing it again!
audio.currentTime = 0;
And there you have it! A drum kit that will jam on and on.
Feel free to share your personal link directly from CodePen to show anyone you'd like!
Check out this version of our Drum Kit with a day and night mode! Honestly, so many cool things we can do to spice up our projects in JavaScript.
Ready to Learn More?
Join our next round of JavaScript or Web Development courses:
JavaScript at Juno:
- Who takes it?
- Graduates of our Web Development courses or those who are proficient in HTML, CSS & responsive design
- Front-end developers looking to add JavaScript to their skillset
- When? Take it Part-Time (once/week on weekends, or twice/week on weeknights) or in an Accelerated format (2 weeks, full-time)
- You'll learn:How to apply programming logic and concepts in order to build applications that interact with data from an API.
- Prerequisites: Completion of Web Development Fundamentals, or successfully completing a technical challenge to assess your HTML & CSS skills.
Web Development at Juno:
- Who takes it?
- Folks who want to take our Bootcamp and become front-end developers
- Those who work with developers (designers, project managers, CEOs)
- People who want to learn a new skill and add coding to their resume
- When? Take it Part-Time (once/week on weekends, or twice/week on weeknights) or in an Accelerated format (2 weeks, full-time)
- You'll learn: How to build a mobile-responsive multi-page website from scratch using HTML & CSS (like this one!)
- Prerequisites: None! These courses are meant for beginners, or those who have dabbled a bit in HTML & CSS.
Extra Resources
- Check out our Favourite Free Resources
- Grab a copy of our Bootcamp Our Student Outcomes Report
- Download the Web Development Student Experience Package
- Download a copy of our JavaScript Syllabus
Feedback Form
We are always looking for ways to improve, it would help us tremendously if you could take a moment to fill out this 6 question survey!
